Tag Archives: Grey Matter

electric batteries and inv

Electricity for Grey Matter – planning and layout

Disclaimer:  I am not an engineer, nor am I an electric expert.  Use this design at your own risk!  Also, feel free to input suggestions! Thank you!

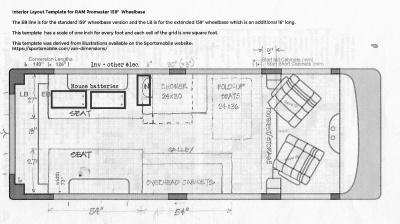
Now, on to the plan – here’s a diagram.  Why such large battery capacity?  (And they are quite large and heavy!)  If we’re off grid, the system needs to be able to run the air cond. for a short time.  The water pump(s), any heat, etc has not been finalized yet.
Grey Matter electric diagram

The plan – the dark lines indicate batteries and a narrow closet which will house the inverter, solar controller and other electric “stuff”. (technical term 😉 )
I had originally thought to place the batteries behind the driver and passenger seat, alas,
the inverter location became an issue.  After searching the promaster forum, these vans are
made to carry 4,000 lbs, so having the battery & inverter weight on the same side isn’t a problem. In fact, it makes the wire runs as short as possible.

Layout:
electric batteries and inv
Elevation:
electric elevation

Next, on to the galley design!

Back home with spiffy equipment

After a prolonged stay in a large garage, Grey Matter is back!  We’re very lucky to have a relative with a large garage who also loves to build vehicles from scratch! A friendly face of a steel bench watched over the work.Steel bench with headlights

The fan was the first (and easiest) to go in.

We will wait and attach the inside plastic mount for the fan when the inside ceiling is installed. van roof fan installed

A kit from Hein (DIYvan.com http://stores.ebay.com/impactproducts)
was helpful to attach the rails which will hold the solar panels.Solar rail attachment kit

Closeup of rail attached

Attaching the solar panels to the rails was a little tricky, requiring a ‘please help’ email to Hein.  After he explained, they went on easy enough.  The solar panels don’t have a lot of space under the edge, so it took a bit of fussing. Kit to attach solar to rails

Solar panel on rail

One down, one to go!

The curved opening for the new side window gave Bob a bit of anxiety before cutting, but it fit perfectly! New side window

The wood required to fit out the thickness needed a little more thickness added to make a snug fit. (Note: after getting it home, we found a slight leak, so we’ll need to remove and reseal it.)

The air conditioner was my biggest concern – the framing and getting it installed with its weight needed to be carefully pulled off. After doing the inside framing, we had questions about how to install the heat element on the ac. Apparently, one needed piece had dropped inside the ac.  Bob finally figured it out, and he and a friend got it installed and done! Yay!

AC with heat element

AC framingAC installed 
A few more minor jobs, and it was on its way home!

GM back home

Upstate New York! Typical winter weather

Next project is completing the electric diagram and layout plans.  This has changed from the original idea, so stay tuned for that update!

Much appreciation and gratitude to Bob for all of his help with this.

Flooring it and taking it for a ride

Not “flooring it” on the ride, haha.

We finished laying the 1/2” polyiso, after taping the edges with house wrap tape, and then fastening 3/4” plywood over it.  Finding the existing bolt holes was a little tricky, but thanks to neighbor Jim, they are all in place.  A couple of the holes do need to be re-threaded, that’s how they came from the factory, as the original bolts were shorter, so they worked okay.  We’re using longer ones to attach the plywood and include the polyiso depth.  You can barely see the polyiso in this shot, but it’s all there!

Plywood flooring

Jamey doing the ‘final’ install of plywood over the polyiso.

Flooring is down!

Flooring is down!

I also got Reflectix, some heavy grey fabric on sale, and fitted them to the door windows.  Spray-glued them together, then finished off the edges with grey duct tape. They friction fit right into the openings, but I got several heavy duty small magnets that can be added if needed.

Window cover fitted in door

Window cover edging

I tried a narrower black duck tape first, but changed it to a wider grey one after

Finished products!

Finished window covers!

We then brought the van to Elmira, where a relative with a large garage can take care of installing the Maxxfan, Mach 8 air conditioner with heat element, solar racks and panels and an opening window on the side. We hope to be able to help with it, and get some pics along the way.  So the driveway will be empty for a while.

Hoping the next post will have lots of good updates to share!

Ram Promaster with noico

Noise reduction

Finally got out to finish installing the Noico.  Got all the way to the wheel wells, and oops! That stuff is sharp! 🔪  Had to run in the house and do a little first aid.

It couldn’t be finished anyway, we’re waiting for a T30 replacement to finish removing the factory floor. The other one skittered away into a floor recess, never to be seen again!

It’s nearly done, here’s a few pics. Ram Promaster with noico